

Achieve The Utmost Performance In CKA Exam Pass Guaranteed
Achive your Success with Latest Linux Foundation CKA Exam
The CKA exam is designed to test the knowledge and proficiency of professionals in Kubernetes administration. CKA exam consists of a set of performance-based tasks that assess the candidate's ability to deploy, configure, manage, and troubleshoot Kubernetes clusters. CKA exam is conducted online and requires candidates to complete a set of practical tasks within a specified time frame. CKA exam covers a wide range of Kubernetes administration topics, including cluster architecture, networking, storage, security, and troubleshooting.
The CKA certification exam is a hands-on, performance-based assessment that tests an individual's ability to perform real-world tasks on a Kubernetes cluster. CKA exam consists of a set of performance-based tasks that are designed to assess an individual's knowledge and skills in Kubernetes administration. CKA exam is conducted in a live environment, and candidates are required to demonstrate their ability to perform tasks such as configuring nodes, managing pods, and troubleshooting network issues. CKA exam is designed to test an individual's ability to work efficiently and effectively with Kubernetes clusters.
NEW QUESTION # 34
Given a partially-functioning Kubernetes cluster, identify symptoms of failure on the cluster.
Determine the node, the failing service, and take actions to bring up the failed service and restore the health of the cluster. Ensure that any changes are made permanently.
You can ssh to the relevant I nodes (bk8s-master-0 or bk8s-node-0) using:
[student@node-1] $ ssh <nodename>
You can assume elevated privileges on any node in the cluster with the following command:
[student@nodename] $ | sudo -i
Answer:
Explanation:
solution


NEW QUESTION # 35
Score:7%
Context
An existing Pod needs to be integrated into the Kubernetes built-in logging architecture (e. g. kubectl logs).
Adding a streaming sidecar container is a good and common way to accomplish this requirement.
Task
Add a sidecar container named sidecar, using the busybox Image, to the existing Pod big-corp-app. The new sidecar container has to run the following command:
/bin/sh -c tail -n+1 -f /va r/log/big-corp-app.log
Use a Volume, mounted at /var/log, to make the log file big-corp-app.log available to the sidecar container.
Answer:
Explanation:
See the solution below.
Explanation
Solution:
#
kubectl get pod big-corp-app -o yaml
#
apiVersion: v1
kind: Pod
metadata:
name: big-corp-app
spec:
containers:
- name: big-corp-app
image: busybox
args:
- /bin/sh
- -c
- >
i=0;
while true;
do
echo "$(date) INFO $i" >> /var/log/big-corp-app.log;
i=$((i+1));
sleep 1;
done
volumeMounts:
- name: logs
mountPath: /var/log
- name: count-log-1
image: busybox
args: [/bin/sh, -c, 'tail -n+1 -f /var/log/big-corp-app.log']
volumeMounts:
- name: logs
mountPath: /var/log
volumes:
- name: logs
emptyDir: {
}
#
kubectl logs big-corp-app -c count-log-1
NEW QUESTION # 36
Get all the pods with label "env"
Answer:
Explanation:
kubectl get pods -L env
NEW QUESTION # 37
Score: 7%
Task
Given an existing Kubernetes cluster running version 1.20.0, upgrade all of the Kubernetes control plane and node components on the master node only to version 1.20.1.
Be sure to drain the master node before upgrading it and uncordon it after the upgrade.
You are also expected to upgrade kubelet and kubectl on the master node.
Answer:
Explanation:
SOLUTION:
[student@node-1] > ssh ek8s
kubectl cordon k8s-master
kubectl drain k8s-master --delete-local-data --ignore-daemonsets --force apt-get install kubeadm=1.20.1-00 kubelet=1.20.1-00 kubectl=1.20.1-00 --disableexcludes=kubernetes kubeadm upgrade apply 1.20.1 --etcd-upgrade=false systemctl daemon-reload systemctl restart kubelet kubectl uncordon k8s-master
NEW QUESTION # 38
Create a pod as follows:
* Name: mongo
* Using Image: mongo
* In a new Kubernetes namespace named
Answer:
Explanation:
See the solution below.
Explanation
solution
NEW QUESTION # 39
Create 2 nginx image pods in which one of them is labelled with env=prod and another one labelled with env=dev and verify the same.
- A. kubectl run --generator=run-pod/v1 --image=nginx -- labels=env=prod nginx-prod --dry-run -o yaml > nginx-prodpod.yaml Now, edit nginx-prod-pod.yaml file and remove entries like "creationTimestamp: null" "dnsPolicy: ClusterFirst" vim nginx-prod-pod.yaml apiVersion: v1 kind: Pod metadata:
labels:
env: prod
name: nginx-prod
spec:
containers:
- image: nginx
name: nginx-prod
restartPolicy: Always
# kubectl create -f nginx-prod-pod.yaml
kubectl run --generator=run-pod/v1 --image=nginx --
labels=env=dev nginx-dev --dry-run -o yaml > nginx-dev-pod.yaml
apiVersion: v1
kind: Pod
metadata:
- image: nginx
name: nginx-dev
restartPolicy: Always
# kubectl create -f nginx-prod-dev.yaml
Verify :
kubectl get po --show-labels
kubectl get po -l env=dev - B. kubectl run --generator=run-pod/v1 --image=nginx -- labels=env=prod nginx-prod --dry-run -o yaml > nginx-prodpod.yaml Now, edit nginx-prod-pod.yaml file and remove entries like "creationTimestamp: null" "dnsPolicy: ClusterFirst" vim nginx-prod-pod.yaml apiVersion: v1 kind: Pod metadata:
labels:
env: prod
name: nginx-prod
spec:
containers:
- image: nginx
name: nginx-prod
restartPolicy: Always
# kubectl create -f nginx-prod-pod.yaml
kubectl run --generator=run-pod/v1 --image=nginx --
labels=env=dev nginx-dev --dry-run -o yaml > nginx-dev-pod.yaml
apiVersion: v1
kind: Pod
metadata:
labels:
env: dev
name: nginx-dev
spec:
containers:
- image: nginx
name: nginx-dev
restartPolicy: Always
# kubectl create -f nginx-prod-dev.yaml
Verify :
kubectl get po --show-labels
kubectl get po -l env=prod
kubectl get po -l env=dev
Answer: B
NEW QUESTION # 40
Create the deployment redis with image=redis and expose it with "NodePort" service redis-service
- A. kubectl create deploy redis --image=redis --dry-run -o yaml >
redis-deploy.yaml
Edit redis-deploy.yaml file
name: redis
spec:
replicas: 1
selector:
matchLabels:
app: redis
template:
metadata:
labels:
app: redis
spec:
containers:
- image: redis
name: redis
//Creating Service
kubectl expose deploy redis --type=NodePort --port=6379 --
target-port=6379 --name redis-service
// Verify
kubectl get deploy,svc - B. kubectl create deploy redis --image=redis --dry-run -o yaml >
redis-deploy.yaml
Edit redis-deploy.yaml file
vim redis-deploy.yaml
apiVersion: apps/v1
kind: Deployment
metadata:
labels:
app: redis
name: redis
spec:
replicas: 1
selector:
matchLabels:
app: redis
template:
metadata:
labels:
app: redis
spec:
containers:
- image: redis
name: redis
//Creating Service
kubectl expose deploy redis --type=NodePort --port=6379 --
target-port=6379 --name redis-service
// Verify
kubectl get deploy,svc
Answer: B
NEW QUESTION # 41
Get IP address of the pod - "nginx-dev"
Answer:
Explanation:
See the solution below.
Explanation
Kubect1 get po -o wide
Using JsonPath
kubect1 get pods -o=jsonpath='{range
items[*]}{.metadata.name}{"\t"}{.status.podIP}{"\n"}{end}'
NEW QUESTION # 42
Update the deployment with the image version 1.17.4 and verify
- A. kubectl set image deploy/webapp nginx=nginx:1.17.4
//Verify
kubectl describe deploy webapp | grep Image
kubectl get deploy -
{.metadata.name}{"\t"}{.spec.template.spec.containers[*].i
mage}{"\n"}' - B. kubectl set image deploy/webapp nginx=nginx:1.17.4
//Verify
kubectl describe deploy webapp | grep Image
kubectl get deploy -o=jsonpath='{range.items [*]}{.[*]}
{.metadata.name}{"\t"}{.spec.template.spec.containers[*].i
mage}{"\n"}'
Answer: B
NEW QUESTION # 43
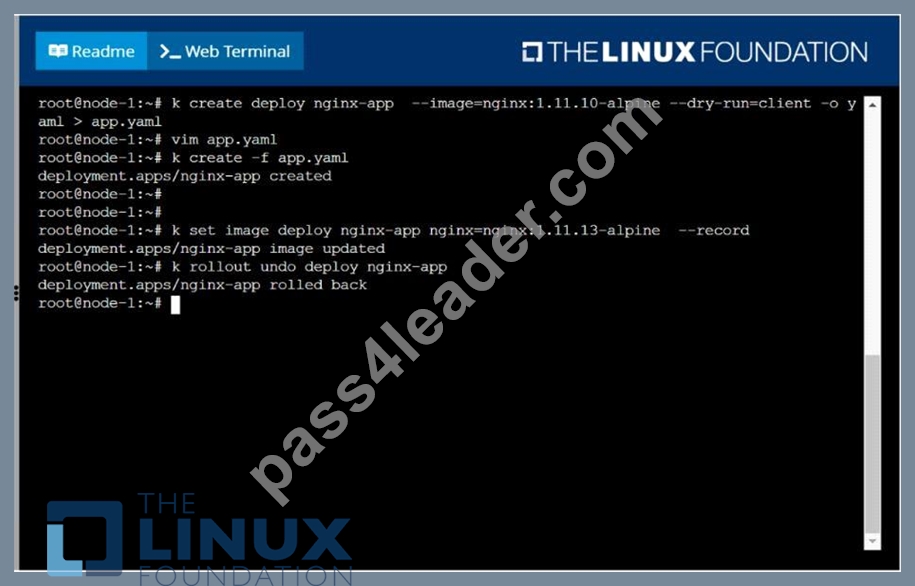
Create a deployment as follows:
Name: nginx-app
Using container nginx with version 1.11.10-alpine
The deployment should contain 3 replicas
Next, deploy the application with new version 1.11.13-alpine, by performing a rolling update.
Finally, rollback that update to the previous version 1.11.10-alpine.
Answer:
Explanation:
solution

NEW QUESTION # 44
Create a deployment as follows:
Name: nginx-app
Using container nginx with version 1.11.10-alpine
The deployment should contain
Next, deploy the application with new version , by performing a rolling update.
Finally, rollback that update to the previous version
Answer:
Explanation:
See the solution below.
Explanation
solution
F:\Work\Data Entry Work\Data Entry\20200827\CKA\7 B.JPG
F:\Work\Data Entry Work\Data Entry\20200827\CKA\7 C.JPG
F:\Work\Data Entry Work\Data Entry\20200827\CKA\7 D.JPG
NEW QUESTION # 45
Undo/Rollback deployment to specific revision "1"
- A. // Check Deployment History
kubectl rollout history deployment webapp
kubectl rollout undo deploymet webapp --to-revision=1 - B. // Check Deployment History
kubectl rollout history deployment webapp
//Rollback to particular revision
kubectl rollout undo deploymet webapp --to-revision=1
Answer: B
NEW QUESTION # 46
List all the pods showing name and namespace with a json path expression
Answer:
Explanation:
See the solution below.
Explanation
kubectl get pods -o=jsonpath="{.items[*]['metadata.name',
'metadata.namespace']}"
NEW QUESTION # 47
Score: 4%
Task
Create a persistent volume with name app-data , of capacity 1Gi and access mode ReadOnlyMany. The type of volume is hostPath and its location is /srv/app-data .
Answer:
Explanation:
See the solution below.
Explanation
Solution:
#vi pv.yaml
apiVersion: v1
kind: PersistentVolume
metadata:
name: app-config
spec:
capacity:
storage: 1Gi
accessModes:
- ReadOnlyMany
hostPath:
path: /srv/app-config
#
kubectl create -f pv.yaml
NEW QUESTION # 48
Given a partially-functioning Kubernetes cluster, identify symptoms of failure on the cluster.
Determine the node, the failing service, and take actions to bring up the failed service and restore the health of the cluster. Ensure that any changes are made permanently.
You can ssh to the relevant I nodes (bk8s-master-0 or bk8s-node-0) using:
[student@node-1] $ ssh <nodename>
You can assume elevated privileges on any node in the cluster with the following command:
[student@nodename] $ | sudo -i
Answer:
Explanation:
See the solution below.
Explanation
solution


NEW QUESTION # 49
List all the pods sorted by name
Answer:
Explanation:
kubect1 get pods --sort-by=.metadata.name
NEW QUESTION # 50
// Create a configmap
kubectl create configmap redis-config --from-file=/opt/redisconfig
// Verify
kubectl get configmap redis-config -o yaml
// first run this command to save the pod yml
kubectl run redis-pod --image=redis --restart=Always --dry-run
-o yaml > redis-pod.yml
// edit the yml to below file and create
apiVersion: v1
kind: Pod
metadata:
name: redis
spec:
containers:
- name: redis
image: redis
env:
- name: MASTER
value: "true"
ports:
- containerPort: 6379
volumeMounts:
- mountPath: /redis-master-data
name: data
- mountPath: /redis-master
name: config
volumes:
- name: data
emptyDir: {}
- name: config
configMap:
name: example-redis-config
- A. items:
- key: redis-config
path: redis.conf
cf
kk kubectl apply -f redis-pod.yml
// // Verify
K kubectl exec -it redis - cat /redis-master-data/redis.conf - B. items:
- key: redis-config
path: redis.conf
cf
// // Verify
K kubectl exec -it redis - cat /redis-master-data/redis.conf
Answer: A
NEW QUESTION # 51
Change the label for one of the pod to env=uat and list all the pods to verify
Answer:
Explanation:
kubectl label pod/nginx-dev3 env=uat --overwrite kubectl get pods --show-labels
NEW QUESTION # 52
Create a namespace called 'development' and a pod with image nginx called nginx on this namespace.
Answer:
Explanation:
See the solution below.
Explanation
kubectl create namespace development
kubectl run nginx --image=nginx --restart=Never -n development
NEW QUESTION # 53
......
Revolutionary Guide To Exam Linux Foundation Dumps: https://www.pass4leader.com/Linux-Foundation/CKA-exam.html
The CKA Exam Test For Brief Preparation: https://drive.google.com/open?id=1pPF_AL_pFLugmAKr2emlIbmoXauYBht4